
This post continues the construction of a six-sided tresoor (dressoir) for Castle Hernen. For those who are in the Netherlands, the finished tresoor can already be found inside the castle, in the room called 'kemenade'. This post concerns the creation of the smaller panels of the tresoor.
The middle small panels
The middle panels follow the basic design of the small middle panels of the tresoor at Chateau Langeais in France, but with some amendments.


The small panels of the tresoor at chateau Langeais: left the drawer panel, right the small panel beneath the larger one. The design has a curving snakelike form.
The curving nature of the design in the French panel was followed for the design of the Hernen tresoor, meaning that the pattern continued onto the next panel, each time flipping the design horizontally. Further, a rose was added to the design signifying the link with the Duchy of Guelder. First, a test panel was made with a cheap pine wood panel.

The pine test panel clamped to the frame of the tresoor. A piece of the larger panel can be seen on top of it.

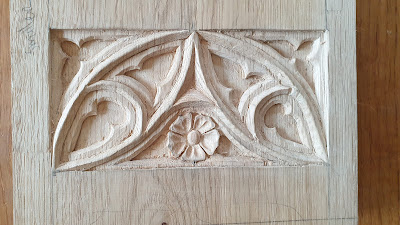
The design for the middle panels. Here the first layer has already been finished and the drawing for the second layer was added. Oak panel.

The design for the front panel of the drawer.
The workflow was identical to that of the large panels (see previous post): The layer was roughly deepened with help of a router and then cleaned and carved by hand with chisels and gouges. The router was used free-handed, staying close to the lines drawn on the panel. The middle panels were still attached to the large panel during the routing and carving process, making it easier to clamp to the workbench. This also assured that the clamps did not get in the way of the router movement.
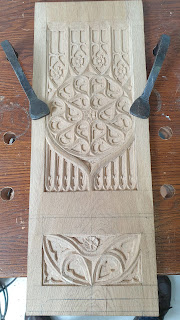
Left: The finished carving of the panel. Right: The large and smaller panel still connected and clamped.
Whereas the large panels consist of three layers, the middle consists only of two. The second, deeper layer has large chamfers around the edges making only a suggestion of three layers in total. After the carving the bottom side - i.e. the side that does not go into a groove of the frame - was sawn in a curving form with a scrollsaw. The curves were cleaned with chisel, gouge, scraper and spokeshave. After that the smaller panels were cut loose from the large ones.

The drawing added for the scrollsaw.

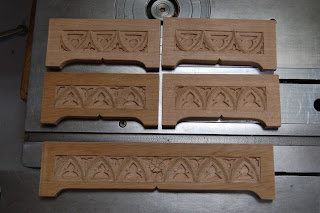
Two of the panels with their front size ready.

The four small panels attached to the large one. You can see the design is flipped with each next panel.
Next, the backside needed chamfering on three sides in order to fit in the grooves of the frame. A basic chamfer was made using a table router, but the edges needed to be made smaller and wider by hand using a round moulding plane. Clamping was especially difficult here due to the small panel size. Finally the panel was sanded when needed and oiled with linseed oil.


Left: The table router set-up. Right: clamping the small panel for hand planing. You can see that the chamfer is larger and thinner than the one leaving the table router.
The bottom small panels

The design for the bottom panel.
The bottom small panels at the feet of the tresoor are the smallest panels. There is not much space available on the oak to carve a pattern. Hence, the pattern had to be a simple one. A design was made very loosely based on a small panel of a 15th century 'waschkästchen'. For the larger front panel a rose was added.


The grain of the wood runs horizontally for these bottom panels. Left: Two bottom panels attached to each other, the first layer carved. Right: Freehand routing of the second layer finished, the remainder to be done by hand-carving.


Left: A board with the front bottom panel and one side bottom panel. Right: a board with two small bottom panels with the upside down design.

The front bottom panel finished, with a rose in the middle.
Like the small middle panels, the design is flipped horizontally with each the next panel. Also similar is that the panel only consists of two layers. Different however is the grain of the oak panel. For the large and middle panel the grain runs vertically, in the bottom small panel the grain runs horizontally. This was simply done for economic reasons. I had plenty of smaller oaken boards available, and less wide ones. During the process I found that the oak of some bottom panels did not match well with the oak of the other parts of the tresoor, being too coarse in grain structure. I made some new ones, and the surplus coarse carved panels ended up in another project.

The finished front and back sides of the small bottom panels.
The carving and routing process was the same as for the middle small panels, however clamping was problematic, due to the even smaller size of the panels. Some additional oak boards had to be added to the sides to provide a stable platform for the hand router, and to prevent movement of the small bottom panel. The same was true when the chamfer was made on the backside.

Some extra support guides were needed when the table router was used.


Left: Clamping was difficult when the backside needed some extra handplaning. Right: Fitting the bottom panel in a test groove to see if the chamfer was thin enough.
After the panels were finished, the bottom grooves had to be made. For the small 5-sided vertical rails a jig was made to make it easier to clamp it and cut out the groove.


The positioning of the small bottom panels before the frame.


The jig and clamping the small five-sided vertical rails.


The bottom panels ready in the frame of the tresoor.
No comments:
Post a Comment