Tuesday 12 December 2023

Tresoor of castle hernen (part 7): the hanging stiles.

Six-sided medieval dressoirs, like our Hernen Tresoor, often had some free hanging stiles with a decorated end. Also larger four-sided dressoirs could have such a free hanging style in the middle of the front. The decorated ends come in two versions: fifteenth century dressoirs tend to show an upside down pyramidal decoration, whereas later a shift to decorated bulbs (e.g. the Langeais dressoir) and (female) figurine busts occurs. 

A four-sided dressoir with an upended piramid end of the free hanging stile. Oak, late 15th century. Heigth 131 cm, width 126 cm, depth 48 cm. Image scanned from the book Le mobilier Francais du moyen age a la renaissance, by J. Boccador.  

A four-sided dressoir with an upended piramid end of the free hanging stile.  Oak, around 1480-1490. Heigth 145.5 cm, width 99 cm, depth 48.5 cm. Image scanned from the book Le mobilier Francais du moyen age a la renaissance, by J. Boccador.  

A six-sided dressoir with an upside down piramid end on the three free hanging stiles. Oak, around 1490-1500. From the collection Bresset. Image scanned from the book Le mobilier Francais du moyen age a la renaissance, by J. Boccador.  

The six-sided dressoir from Chateau Langeais, France with bulb-headed ends of the free stiles. 

Dressoir with floral decoration. France, first quarter of the 16th century (and parts 19th century). Oak, Height 161.5  cm, width 120 cm, depth 53.5 cm. Louvre Inventory nr. OA 6972. Image from the book by Agnès Bos, 2019.

As we wanted to create a more late medieval look, we chose the upside down pyramid style for the tresoor of Castle Hernen. 

A high six-sided dressoir at chateau Langeais, France, with female buste ends.

Two figures at the end of the stile. Left is one of the ends of the Louvre dressoir above.

Four upended pyramidal forms from the book of J. Boccador.

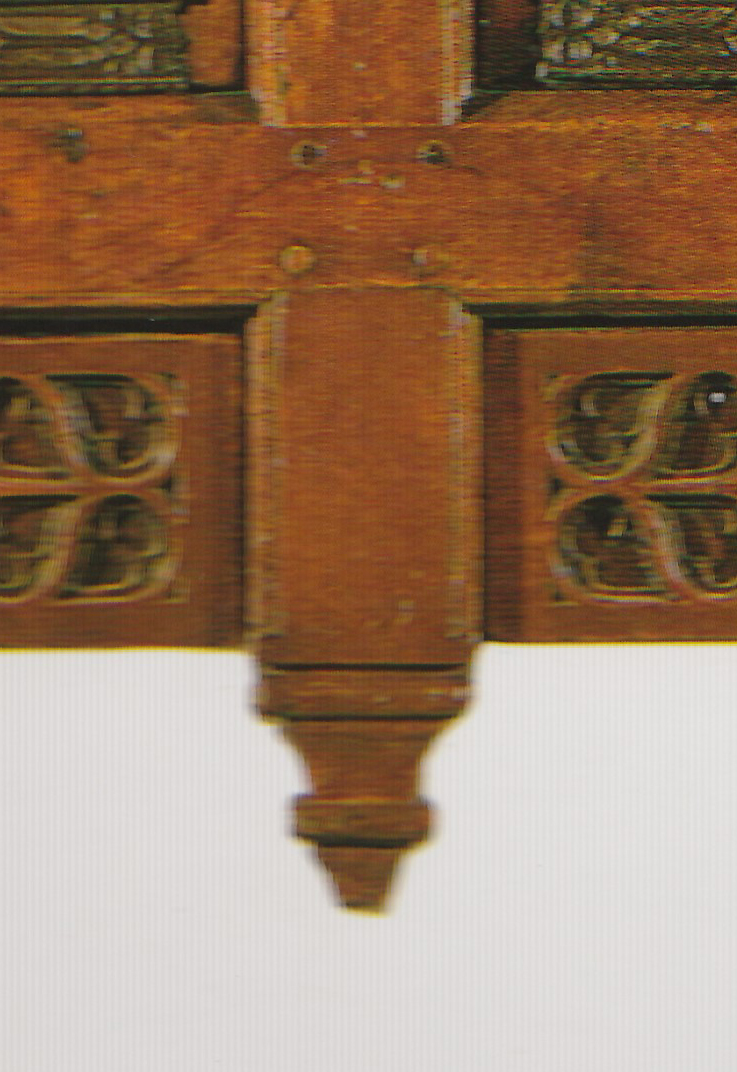
Creating the upended pyramid

Carving an upended pyramid is easy when you have a square stile to start with. The castle Hernen tresoor, however, has an unequal pentacle, making the planning of the carving a bit more difficult. The pyramid was planned to have two parts, divided by a rim. I started by removing the unnecessary part of the stile by saw at the small pyramidal part (The area X at the schematic drawing). Then the slope of the larger pyramid was carved, taking care of the fact that the rim/ring was to be larger than the top of this part of the pyramid. A groove was made at the bottom of the pyramid and on both sides of the ring/rim. Then the smaller pyramid was similarly carved using a chisel.

Schematic drawing of the decorated stile with an upended pyramid. Before carving the slopes, The area X was sawn out.

The area to be sawn off is marked with a marking gauge.

Then the slope of the large pyramidal part was cut with a chisel.

Grooves were carved at the bottom of the pyramid with chisel and a small gouge.

Fitting of the stile when the first part of the pyramid was carved to check the look and feel. 

The finished carving of the stile ends on the tresoor.

Unfortunately, we miscalculated the length needed for the carving, and there was no oak left on the stile for the final tip. We then decided to glue this tip separately to the end of the stile.

Making the tip

In order to make the tip, first a round stick was needed. I used a square piece of oak and shaved it to an octangular piece, then to a 16 sided piece, and finally rounding it of with a shave. The tip was then roughly formed on a belt sander. Both sides of the stick were used, thereby providing the two necessary tips. The rough tips were smoothed by hand using sandpaper with incrasingly smaller grit-size.

(Left) Creating the round stick. (Right) Rounding the tip using a belt sander.

(Left) The rough tip by the belt sander and (Right) the smooth polished tip using different sandpaper grits.

The tips were sawn off the stick, and then a 1 cm diametre hole was drilled in the middle of the tip using a Forstner bit. A corresponding hole was drilled in the middle of the stile. To connect both tip and stile a 1 cm rod was glued to the tip, and then to the stile. The 1 cm diametre oak rod was created using a dowel plate. Hide glue was used to secure the pieces.

The rod glued to the tip.

The drilled hole in the stile. The square is used as guide for the drill.

The finished stile ends.

The dressoir with the finished stile ends.

Sources:

  • Agnès Bos, 2019. Mobilier du Moyen Âge et de la Renaissance - La collection du musée du Louvre. Musée du Louvre, Paris, France. ISBN 978-2-35031-639-0. 
  • Jacqueline Boccador, 1988. Le mobilier francais du moyen age a la renaissance. Edition dÁrt Monelle Hayot, St-Just-en-Chaussee, France. ISBN 2-903824-13-4.

Friday 8 December 2023

Thomasguild at a podcast

 At 7 July the Thomasguild woodworkers Bram and Marijn were guests at the historic open air museum in Eindhoven. The manager of the museum Yvonne Lammers conducted an experiment where she lived, cooked, ate and slept for two months in the medieval craftsman house. During that time she kept a diary which can be read online. Each week had a special theme, and experts were invited to discuss the topic of that week. The panel discussions were recorded and made into a podcast (in Dutch language).

The topic of 7 July was medieval woodworking, and experts from university (Roos van Oosten, professor of medieval history at Leiden University), archaeology (Ilse Lange - wood specialist at BIAX and Jeroen Flamman - Vestigia), a professional historic woodturner (Martijn van Gerwen), a professional historic carpenter (Leo Wolterbeek) and re-enactment (Bram and Marijn - making medieval furniture at the St. Thomasguild, and Vincent van Deventer - writer and general guild specialist). We discussed the use of paint, wax and linseed oil, tools for woodworking, turning vessels and the making of 'daubenschale' among others.

Some weeks ago I discovered the podcast of our topic on Spotify. For those that are interested and understand Dutch, this is the link: https://open.spotify.com/episode/663vzEuLxocN1NoFjOm4aC?si=rqtaURHSQI-Z_9aCgooSGQ


Friday 17 November 2023

Some more madder business

Both blogs on colouring bone and antler red with madder (part 1 and part 2) had attracted the attention of the Dutch historical bone and antler craftsmen of Bikkel and Been. Monica, one of the members of the company had been working on a replica of the Gloucester medieval backgammon set - the board as well as the game counters, as it was found complete - for the French re-enactment group Aisling 1198 (the same group that received my alquerque game set). The board dates from  the 11th or early 12th century and is made up of 150 bone pieces with carvings in an art style associated with vikings (Borre, Ringerike and Urnes artistic styles). The boardgame was found in a rubbish pit at the site of the Norman castle. There is no evidence to indicate that the board was hinged. Corrosion from iron pins indicates that the bone inlay was fastened to a wooden base, about 600 by 450 mm in size. 

Linedrawing of the Glouchester trictrac board design. Scan from the book  Schach und Trictrac by Antje Kluge-Pinsker.

The points are obelisk shaped. Roman boards had square points, whereas triangular points appeared in the 13th century. The board includes spaces between points, and rectangular plates laid lengthways down the centre of the board. The latter are covered in an interlaced snake design. 

The original Glouchester board. Photo by Celuici - CC BY-SA 3.0, https://commons.wikimedia.org/w/index.php?curid=79572888

The board made by Bikkel and Been for Aisling 1198.

The playing pieces - a full set of 30 -  are in the Romanesque style of the Normans. The pieces average 44.5 mm in diameter and are 7.5 mm thick. It is possible that a lathe was used in the manufacture. A central dimple is present on 26 of the 30 pieces.  Fifteen pieces are made from red deer skull bone and the other 15 from red deer antler (but this is not easily distinquisable for a player). There is no evidence that the pieces were stained to create two distinctly coloured sets. There is also no unifying theme in the symbolism, making it difficult to group the  counters into two sets. Different scholars therfore propose differnt groupings. I must confess that I do not know which grouping has been made for the Aisling replica counters.

The 30 original game counters. Compilation of the photos by Celuici - CC BY-SA 3.0.

The game counters were carved in bone as well as antler and contain scenes from Greek mythology as well as other topics. Each game piece has a different design. For ease of playability with the replica counters it was decided that one set had to be coloured red with madder. Medieval trictrac counters coloured with madder are not uncommon, and can be found in many museum collections (for instance in the Museum für angewandte Kunst in Köln, Germany). They asked if I could help with the colouring process.

There were some additional spare counters made, so the total to be coloured was actually 18 pieces.

Some details of the counters.

Colouring of (half of) the Gloucester counters was done last year November at our house with Sylvestre of the Aisling group present (and doing most of the work). The process was the same as done for the alquerque pieces. The weight of the 18 pieces (there were 3 spare ones added to the 15) was around 320 gram. The counters were presoaked in water for one hour.  During that time the madder solution was made with 14 grams of madder extract and 4 grams of sodium in 400 ml water at 60 degrees Celsius, also for one hour.

Soaking the counters in water.

After that the counters were kept for 2 hours at 60 degrees Celsius in the madder solution. We used 2 jars for the counters so they would touch each other as little as possible, thereby avoiding problems with colouring. After the 2 hours, the counters cooled down overnight in the madder solution. The still wet pieces were then taken home, where walnut oil was applied when the pieces were dry. The walnut oil then needed to dry as well for some weeks. 


Dividing the counters over two glass jars, so that the counters did not touch each other .

Dividing the madder solution equally among the jars.

The counters just after they were dropped in the jar with madder.

A few counters directly after the one hour madder bath at 60 degrees. Some parts were still a bit lightly red coloured.

The wet counters after a one night cool down in the madder solution.

The pieces when dried a bit with a kitchen tissue. I also coloured two small dices.

All the 30 counters on the Glouchester board.

The game counters in use on the Aisling 1198 Glouchester tablas board. Here the board is set-up for 'a game of 'Todas Tablas' (for rules, see the Libre de los Juegos created by king Alphonso X the wise in 1283).

Sources:

  • Grandet, M. and Goret, J.F., 2012. Echec et TricTrac - fabrication et usages des jeux de tables au moyes âge', Editions Errance, Paris, France. ISBN 978-2-87772-503-3.
  • Kluge-Pinsker, A., 1991. Schach und Trictrac. Zeugnisse mittelalterlicher Spielfreude in Salischer Zeit. Jan Thorbecke verlag, Sigmaringen, Germany.  ISBN 3-7995-4138-1
  • Wikipedia: The Glouchester tabula set. https://en.wikipedia.org/wiki/Gloucester_tabula_set

Wednesday 15 November 2023

A painting of the woodworkersshop of (Saint) Joseph


The doubt of Joseph by the Master of du Jardin de Paradis, early 15th century. Musee de l'Oevre Notre Dame, Strassbourg, France.

I have been able to view this painting myself last summer in the museum, which also holds quite some medieval chests and chairs. The painting is impressive as there are many interesting things to see with regards to woodworking. For instance the workbench is the first medieval one that I know of, that actually has a specific shelf for holding tools beneath the benchtop.


Also the tools displayed on the shelf and the benchtop are worth a closer look. On the shelf lies a special chisel, a so-called dog leg chisel. These chisels are used for finsihing rectangular depressions and undercuts, but I have never encountered a medieval one before. The two other tools are a typical medieval push saw - although usually this saw is encountered in larger versions - and a typical medieval hammer.


The woodworking tools on the top of the bench are also interesting. A medium-sized block plane (looking similar to the French one found in Lake Paladru, containing a small blade. Next is something that is either a (large) knife or a mortise chisel. Considering the special chisels shown on the painting, I think a mortise chisel is more likely. The other chisel shown looks like a short firmer chisel. Usually, medieval chisels flare out, like a fish tail, however this one has a short straight broad cutting part -  a bit remiscent of a Japanese chisel. The last tool on the table is a gimlet.


The table next to Maria shows some thin wooden boxes and a band comb used in band weaving.