Sunday 22 December 2013

Some pouches and purses of the St. Thomasguild part I

The kind of medieval pouches shown in a previous blogpost, as well as those described in the catalogue of medieval textiles from the treasury of the St. Servatius church in Maastricht, the Netherlands (see photo below) did inspire Anne to make some pouches as well.

A 14th century pouch made from four pieces of Italian lampas silk (red/green/white with gold threads) with red pompoms. The pouch was made from four downward tapered segments, of which two were cut out from the same repeated pattern (birds and other animals). The leather lining is connected to the outer fabric with the seam covered with a green braid. The attachment and closing cord of the bag is also made of a green braid. The pompoms are attached to the side and bottom of the pouch. 16 cm height, 18 cm width. Image from the book Mittelalterlichen Textilien von St. Servatius in Maastricht by A. Stauffer.


Anne's version of this pouch is smaller (7 cm height, 8 cm wide) and made of embroidered silk. Blue silken pompoms are attached at the four corners, as well as at the drawstrings. The inside is made of a cream-coloured silk. We would like to place some remains of St. Thomas (or fragments of his clothes) inside the pouch, like that of the reliquary pouch from Maaseik (Belgium), but have not found some yet. Early next year, Anne will visit India and perhaps she can locate a something of him (for instance, a brick from the palace that St. Thomas built or a tooth from the dog who brought the hand of the cup-bearer that offended St. Thomas at the wedding feast).


Different views of Anne's pompom pouch.

 
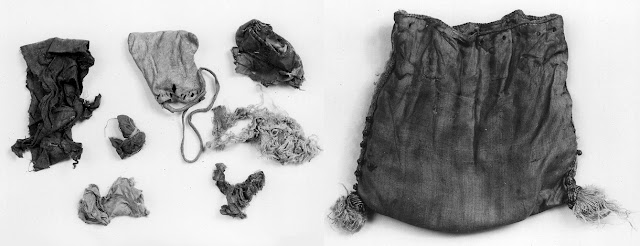
Six textile fragments and a small leather purse: the contents of a reliquary pouch from the shrine of Johannes Nepomucenus from the St. Catharina church in Maaseik, Belgium. The pouch (right) and fragments (left) are dated between 1200 and 1400. The pouch itself is made of silk and measures 11 cm (height) by 9 cm (width). At the sides are small metal beads or pearls. Photos from KIK IRPA, Brussels, Belgium.

Another small purse (also 7 cm height by 8 cm wide) that Anne made of some leftover red silk with a cream-coloured pattern. The inside is the same cream silk as the pompom pouch. The drawstring consists of two colours of silken embroidery thread, and made as medieval rope (but using a cordless power drill to speed up the process).


Anne's second pouch. you can clearly see the holes at the top of the pouch through which the drawstring goes.  
The pouch closes by pulling the string simultaneously at the opposite sides.

The Maastricht brickstitch pouch with silk stitching on linen ground. Yarn colours are red (now beige), bright blue and gold-plated silver. Inside of the pouch is red taftsilk. Height 9 cm, width 14 cm. Image from the book Mittelalterlichen Textilien von St. Servatius in Maastricht by A. Stauffer.
 
The following green and red pouch is based on the brickstitch pattern that is found on a reliquary pouch (dated around 1300) in the Maastricht treasury. A handout of this pattern (used to embroider the pouch) can be found at the excellent Medieval Silkwork blog. This pouch has been Anne's first attempt at brickstitch embroidery. The pouch measures 10 by 13 cm, while the actual brickstitch area is (twice) 10 by 10 cm. The inside and the border are made of red silk. The pouch closes with a two-coloured drawstring, made the same way as described above. The pouch now holds a collection of embroidery yarn and utensils. An interesting post on medieval embroidery yarn and the modern equivalents is also found at the Medieval Silkwork blog.


Anne's version of the Maastricht brickstitch pattern pouch. Both sides are embroidered with the brickstitch pattern.


Monday 16 December 2013

The eagle heads of the sella curulis finished


Hurray! Yesterday I finished carving the eagle heads for the sella curulis, a medieval folding chair. The carving went faster than anticipated and I am quite happy about the result. Next are the four claw-feet to carve. I already have a test claw-foot made, and I expect it to be easier to accomplish than the eagle heads. Above and below two photos of the chair with the finished heads.

Thursday 12 December 2013

JSTOR for your medieval research

JSTOR (journal storage) is a digital library of academic journals, books, and primary sources. Not all science journals or science subjects, but quite a lot. You might ask yourself what this has to do with medieval furniture or re-enactment. But there is a link. Archaeological finds and medieval (art) history studies end up in scientific books and journals. These are not so easy to access for the common re-enactor outside the academic world. You have to go to an university library to find them. A lot of these scientific journals are electronically available on JSTOR. Normally an university pays for its employees to have access to the service, but JSTOR now also has a service available for you. You can read up to three items on-line for free (your 'bookshelf' is cleaned after 13 days, after which you can select another three). This opens up a lot of interesting material which can be used by us, re-enactors and replicators, and anyone interested in medieval history.

For instance, if you type 'medieval furniture' in the JSTOR search engine, you end up with more than 600 pages of results. Let's be clear, not all these articles primarily deal with medieval furniture, but many do. The top of the list is headed by the book of P. Eames (1977) "Furniture in England, France and the Netherlands from the twelfth to the fifteenth century" Journal of the Furniture History Society volume XIII. This fantastic 398 page book can be read on-line. You can of course buy this book second hand (I did) for over 100 Euro, but there are not many on the market. 


It is not restricted to furniture. You can read as well something on medieval purses and embroidery in "Maaslandische Stickerei um 1300" by Leonie von Wilckens in the Zeitschrift fur Kunstgeschichte (Vol 49, page 467-480).  The possibilities are unlimited ... Why not use it?


My first JSTOR shelve, tried out today.

Wednesday 27 November 2013

Aumonieres and purses from Germany

Aumonieres (pouches used for carrying money or alms for the poor) and reliquary pouches (pouches containing relics from saints, like pieces of bone or cloth) were often made from expensive materials and could be beautifully embroidered. Still, surviving examples from medieval times are a rare find. We did encounter several of those pouches in museums in Germany and luckily we were able to take some photos of them. The first aumoniere shown here is from the Museum für Kunst und Gewerbe (Arts and Crafts Museum) in Hamburg. The museum has a small part dedicated to medieval reliquary items, such as the Osterteppich, some aquamaniles and also an embroidered aumoniere.

The aumoniere in the museum dates from 1340 and is a typical example of the type made in the mid-14th century in Paris, France. The aumoniere is made of linen and are embroidered with silk and gold yarn using the stem stitch. Many tassels decorate the edges of the purse, as well as the ends of the drawstring. The image on the aumoniere is that of two lovers in a garden. The backside of the aumoniere is embroidered with a different image, but of the same theme.

 The tassels of the aumoniere are differently coloured.

Left: The other side of the aumoniere, also with two lovers in a garden, is shown in the book 'Embroiderers' by K. Staniland (British Museum Press, 1991). Right: A side view of the aumoniere.

 
Two views of the edges of the aumoniere.

The Stadtmuseum of Koln also has a collection of pouches which are ascribed to Hermann von Goch, a wealthy and powerful citizen who was accused of treason in 1398 and whose belongings were confiscated by the city counsel. These items and the accompanying documents of his household were kept for safekeeping in the archive of the town hall and nowadays on display at the museum. The descriptions of the purses are based on the museum catalogue 'Mittelalter im Koln, eine auswahl aus den bestanden des kolnischen stadtmuseums' by W. Schafke and M.Trier (ISBN 978-3-89705-654-1).


Money purse with a dog. Nowadays the gold yarn is almost faded away, 
and it is difficult to see the image of the dog on the purse.

This money purse with a picture of a dog has been dated to the 15th century based on the method of manufacture. The origin of the embroidery and the metal yarn used for the decoration likely comes from the Netherlands, although the fine details of the decorations are more typical of the neighbourhood of Cologne. The purse is made of two parts, which are stitched together with two crossed rows of pearls. On both sides is a gold embroidered image of a dog, with a text-band with the words 'ich geren' (the exact meaning is unclear to me). The actual purse is covered by a green-red coloured netted cap which can be pushed up and down along the cord that was used to attach the purse to a belt. Probably the netted cap  served as a protection against thieves. At four points of the purse are brass bells attached. Purse: height 7.3 cm, width 11.3 cm, depth 5 cm; Netted cap: height 4cm, width 9 cm, depth 5.5 cm.


Left: A drawing of how the purse would have looked like in the early 15th century. Top left is one of the other money purses. Right: a photo of the purse and the netted cap. Both images are scanned from the museum catalogue.

Three (money) purses in the museum were are attached to each other with their belt cords. The first purse is half-round and made from four pieces of green damask silk. The top edge is lined with a red string with directly below a green cord that was used as a drawstring. It has two green tassels at the end. The inside of the purse is lined with white leather. This type of damask cloth was not made in Europe (Italy) before the 15th century; therefore this purse is dated later than the death of Hermann von Goch in 1398. Height 4.4 cm, width 4 cm, depth 3 cm.
The second purse is made from four pieces of white leather. The purse is closed with a drawstring with small leather buttons at the end. The darker parts of the purse contain a high amount of iron particles, likely of metal decorations. This type of purse with metal decorations was common in the 14th and 15th century. Height 4.5 cm, width 5 cm, depth 3 cm
The third purse is made of red and green silk with silver and gold yarn woven in samit style (weft faced compound twill). The style of this purse is typical for Cologne from the 13th to the 15th century. The drawstring is made of blue silk yarn. Both the purse and drawstring are decorated with leather buttons. Height 4.3 cm, width 6 cm, depth 2.2 cm.

Also a reliquary purse from red silk with a green silk drawstring is shown on the next photo. The inside of the purse is lined with yellow silk. Height 3.5 cm, width 3.9 cm and depth approx. 1 cm.

 Three small money purses attached to each other. On top right a reliquary purse in red silk is shown.


A silk cap for a money purse made from four silk triangles with woven heraldic signs (an eagle and a wild animal). This type of silk cloth was likely imported from Italy in the 15th century. The edges of the cap are connected with a cord with gold-plated silver yarn ending in a crocheted button. Height 8.8 cm, width 8.4 cm, depth approx. 7 cm.


 The silk cap for a money purse showing a heraldic eagle.

 Left: the other side showing a heraldic wild animal. Right: detail from the gold metal yarn. 
Both images are scanned from the museum catalogue.


The next photos are of a leather money purse with three attached smaller leather purses and a leather drawstring with coloured cloth buttons. The top edge of the purse is decorated with red silk. Height 18 cm, width 16 cm.


 The buttons on the edge of the drawstring are red-white-green coloured.

 The red silk cord around the edge of the leather pouches can easily be seen.

The following leather pouch from the Kolnischen Stadtmuseum does not belong to the 'Hermann von Goch' collection. This medieval pouch contained official coin weights - the weight that the coins minted by the Archbishop of Cologne should have - and carry the seal of the bishop as well as that of the city. They clearly did not trust each other. The weights were kept in safety by the city council.


One of the three coin weight pouches on display at the museum having both the seal of the city and the archbishop.


This last medieval pouch was in the same display box as the Hermann von Goch collection, but is not found in the museum catalogue. The pouch is made of white leather and has a loop for attachment to a belt. Two smaller pouches are stitched to the main pouch. The pouch is decorated with leather buttons at the edges and the flaps. All the pouches close with a thong.


The belt loop of the pouch has a buckle.

Saturday 16 November 2013

Entrails

What do entrails have to do with feast and food? It is a spectacle food or 'entremet', set between the normal courses of a medieval feast. It was made to awe or shock those sitting at the table, like pigeons flying from a pie, a gilded pigs head, or in this case a bunch of fried 'entrails'. The fun is of course that it only resembles entrails from the outside. The recipe is called 'Trayne Roste' and is given in Harleian MS 4016 - and translated in the 15th century medieval cookbook 'Take a thousand eggs or more' by Cindy Renfrow (ISBN 978-0962859847). Bram made this delightful dish at Castle Loevestein in Poederoijen, the Netherlands last year using the medieval castle kitchen and roast spit.

A double roast in the kitchen of castle Loevestein: two chickens at the top spit, and the 'trayn roast' at the bottom. 
Bram holds a skillet with dough to pour over the 'Trayn roast'.

"Take dates and figs and cut them in a penny's breath; And then take great raisins and blanched almonds, and prick them through with a needle into a thread of a man's length, and one of one fruit and another of another fruit, and then bind the thread with the fruit. About a round spit, along the spit in manner of a haslet: and then take a quart of wine or ale, and fine flour. And make batter thereof, and cast thereto powdered ginger, sugar and saffron, powder of cloves, salt. And make the batter not fully running, and neither standing, but in the mean, that it may cleave, and then roast the train about the fire, in the spit. And then cast the batter on the train as he turns about the fire, so long till the fruit is hidden in the batter, as thou cast the batter theron, hold a vessel underneath, for spilling of the batter. And when it is roasted well, it will seem a haslet, And then take it up from the spit all whole. And cut it in fair pieces of a span's length. And of it a piece or two in a dish all hot."
 

Like in medieval times, (our) children have to take care of the fire and the turning of the spit.

While the translation in 'Take a thousand eggs or more' uses shorter strings and frying oil, we did have a medieval spit at hand in Castle Loevestein and could follow the original instructions to roast the train. For the rest we stayed with the recipe as provided in the cookbook. As a variation dried apples, apricots or walnuts can be used in addition to the fruits used here.

Ingredients:
  • a piece of heavy duty string, 1 to 2 metres long
  • 1/4 cup of sliced almonds, soaked in warm water and drained
  • 18 dried black figs, cut in half
  • 200 gram pitted dates, cut in half
  • 1/2 cup seedless raisins
For the batter:
  • 200 ml beer (or ale or wine)
  • 1 1/3 cup of flour
  • pinch saffron
  • 1 teaspoon of sugar
  • 1/4 teaspoon clove powder
  • 1/2 teaspoon ginger powder
  • dash of salt

Using a sharp needle, carefully thread the dried fruits and nuts onto the string. Alternate the fruits and nuts to achieve an uneven appearance. Wind the string onto the spit.
Beat together the beer, flour, salt and spices in a mixing bowl. Drip the sticky batter over the fruits, while holding a bowl under it, to prevent dripping on the floor. Another person must slowly rotate the spit, so the batter can be applied evenly over all the fruits. The fruits must be coated completely with the batter. Rotate the spit until the 'train' is roasted golden on all sides. Serve warm.


Bram prepares another dish.

Sunday 10 November 2013

The eagle heads of the sella curulis

It has been more than a year since I posted on my sella curulis project. During this time almost nothing happened to the medieval folding chair. I had to carve the four eagle's heads, and was very reluctant to start with the feathers, thinking this would take a long time to do and that perhaps there was a smarter and faster way to do it. Then, a couple of months ago I laid my hands on an interesting book 'Make a joint stool from a tree' by Jennie Alexander and Peter Follansbee (ISBN). This book is basically showing you the 17th century joinery techniques. One of the decoration techniques described produced a carving which did look a bit like a line of feathers. The technique looked very straightforward and easy to do. You only needed a scratch stock and some gouges.


Above: The decoration technique as shown in Peter Follansbee's book 'Make a joint stool from a chair'. Left: The adjustable scratch stock from the book.


The scratch stock feathers


I did have gouges, but no adjustable scratch stock. It needed to be adjustable in order to 'crease' mould parallel lines for the rows of feathers. The scratch stock looks very similar to a marking gauge, which I had made before. Thus I made an scratch stock myself of some spare pear wood from the sella curulis project. As scratch blade I used a cut-off piece of a scraper, which I filed in the form needed. The scratch blade was hold into position with a bolt-screw and nut.


My adjustable scratchstock made from pear.

Unfortunately, the moulding technique from Follansbee's book did not produce good eagle feathers. The scratch stock could not follow the curve of the head, and the lines of feathers did not look very natural. Luckily I only tried it out with some test eagle heads.

 
Two test pieces of the eagles head. The left one shows the first attempt at carving the feathers, the right one the lines of feathers using the technique from 'Making a stool from a tree'. 


You can see that the scratched lines are unable to follow the curve of the eagle's head.


Carving the eagle's head

Before being able to start carving feathers, I needed to shape the head of the eagle, and carve the beak and eyes. I used a  test eagle's head as a model for the four heads of the chair. A pencil line was drawn on the middle of the head as a guide for symmetry. The rough carving of the head was done with a draw knife, and the detailed sculpting and smoothing with gouges (sweep 2, 3, 5 and 7) and a carving knife. At first, the beak of my eagle looked more like a beak of a parrot. However, I could adjust this to a beak more suitable to a raptor by changing the form of the beak, as well as the mouth line. Together with the eyes it produces the grim look of a (bald) eagle...

The (bald) model head of the eagle. 


Carving the fourth 'bald' eagle head. You can see the pencil line in the middle of the head as a guide for symmetry. At the back the second (finished) and third (half-finished) eagle heads can be seen.


The first two 'bald' eagles.


Carving the eagles feathers


With the scratch stock feathers being unsuitable for the sella curulis, I was at loss. Luckily, someone commented on a blogpost of mine and mentioned he was a wood carver. He offered advice and hinted on some tools that could be of help: fishtail gouges and hooked skew carving knives. This last one is also called an Abegglen detail knife. It is sharpened on both sides with a hollow and round ground blade. I added another gouge to this set: a 7 mm wide, sweep 11 gouge that has the same rounding as the tip of the feathers. For those who want to know it, the carving knife is custom made, while the gouges and the Abegglen knife are from Pfeil.

The carving tools used most for the feathers starting from above: a fishtail gouge (sweep 5), an Abegglen detail knife, a sweep 11 - 7 mm gouge and a carving knife.

With the use of these tools, carving proved to be far more quicker and easier than I anticipated a year ago. At the moment already two eagles heads are finished, and the third is on it's way. In the photos below the process of carving is shown and the final result.

First, pencil lines for the feathers are drawn on the head.

 Then the tips of the feather are marked by pushing the sweep 11 gouge into the wood.

A carving knife is used to extend the markings of the feather tips, and connect the feathers to each other.


The fishtail gouge is used to deepen the cut at the feather tips. 

The Abegglen knife is used to cut deep into the connecting point of the feathers.

The deep cut triangle is removed by a flat cut of the Abegglen knife.

Finally, the Abegglen and carving knives, as well as the fishtail gouge are used 
to create an overlapping 'roof tile' feather structure.   

A finished eagles head


The back and side view of a finished and an unfinished eagles head.