Showing posts with label tresoor. Show all posts

Thursday, 13 February 2025

Tresoor of castle hernen Part 11: The tresoor at the castle


On 18 September 2022 the finished tresoor officially moved to its final place in castle Hernen to be revealed to the general public.
 

But first ...

Whereas the tresoor was ready, there was still one thing to be added to it: our signature. We did not want it to be easily seen, but it should be visible without moving the tresoor. So the backside was not an option, and of course all the front parts as well. We decided on the frame, underneath the lower plateau of the tresoor. on your knees, using a lamp from your mobile phone you would be able to spot 'St. Thomasgilde MMXXII' written (or burned) with a pyrographic pen. 

Our signature on the tresoor.

To the castle ...

The tresoor just fitted into our car, so the travel to the castle proved to be no problem. This time we drove our car into the small courtyard, so that we had a smaller distance to carry. Hoisting the tresoor on the stairs and moving it to the kemenade was a bit more work. We first thought the tresoor would fit well againt the (otherside of the) wall of the main hall, but it appeared a bit lonely there. We then moved it to its current place on the opposite wall, next to a large window and a candle stand.


The tresoor is now fully integrated in the tour of the castle. It is especially satisfying that visiting schoolchildren with a visual handicap also had much fun with the tresoor, as they could feel the carving of the knight and the dragon, and the working of the lock.

Providing the curator of the Stichting Gelders Landschap en Kastelen with the key of the tresoor.

 Bram and Marijn telling the secret story of the Tresoor of Castle Hernen: of how Reyner van Wijhe was tricked by the St. Thomasguild to be a member of the pro-Guelders faction (see blogpost 6 of the tresoor).


Two photos of the tresoor at the incorrect spot in the kemenade of castle Hernen.

Sunday, 2 February 2025

Tresoor of Castle Hernen Part 10: the lock and hinges

The lock with key, and hinges in place. Note the red leather under the hinge.

One of the last things to complete the tresoor for castle Hernen were the metal fittings: the hinges and the lock. As creating elaborate medieval metal fittings is not our focus as the St. Thomasguild, we asked a very good historical blacksmith - Klaas Kloosterhuis - to make them for us. (He also made the fittings to the scapradekijn and our toolbox, among other things.)
 

Designing the metalwork

Medieval fittings ranges from simple curled hinges and lockplates to very decorative ones. The latter are often found on dressoir-like furniture like our tresoor. We took some examples from existing dressoirs and based on that drew our own design.
 

Dressoir in the Musee des Arts Decoratifs, Paris, France dating from the late 15th century.
 
The lock of the same door. The sliding bar is on top of the lock and locks into a separate U clamp.

Details from the hinges, which are fixed to the door with many small nails. The decoration of the hinges is open, showing the woodwork underneath.
 
Tresoor with German style late medieval hinges. Often with openwork hinges there is a reddish coloured layer underneath, either a coloured thin metal sheet or a thin piece of coloured of leather.
 
We first created several designs on paper and tried it out on the wooden door of the tresoor, so we could judge what looked best.
 
The 'winning' design, based on the one in the Musee des Arts Decoratifs.

This one did not make it. We found our tresoor too French in style and too decorative to fit this (a bit0 simpler design.
 
Details of the design for the lockplate and the hinge.
 
The attachment plans for the hinges showing the 112 degree angle at the short end of the hinge. 
Note that in the end no pins or nails were long enough to be folded back.

Creating the metalwork

 
As our blacksmith Klaas Kllosterhuis also is a re-enactor (16th century) and was visiting castle Hernen with his company, we took the opportunity to bring the tresoor to the castle, so he would see it firsthand and we could communicate easier on our expectations for the lock and hinges.  

Some of the 16th century re-enactment members with Bram and the tresoor in the courtyard of castle Hernen.

Some steps in the crafting process of the lock and hinges. Photos taken by Klaas Kloosterhuis.
 

Attaching the metalwork

Now that the finished hinges and lock had arrived (with two keys, i.e. one spare one! This is important to have), we needed to attach them to the tresoor. We started with the lock, as this required additional carving work on the door, and this is more stable and easily done on a flat surface (workbench).

The lock and hinges that had just arrived by post on top of the door.

A space needed to be cut in the door to fit the actual lock hidden behind the lockplate. This cut-out space is often seen on medieval dressoir doors without their metalwork. See the blogpost on the making of the tresoor part 6 for some examples.

The next step was to attach the hinges to the door. This was a bit more tricky. At the actual hingepoint, where most of the forces would occur, there were only a few options for attaching the nails. We thought that it would be better to reinforce this point by drilling two additional nail holes (and have two extra nails per hinge supporting the door). We also added a strip of red leather underneath the hinge. This has a dual purpose of being decorative and protecting the metal from rusting by the acids of the oak.

(Top hinge) The original hinge showing few nailholes at the hingepoint. (Botom hinge) The red dots indicate where new nailholes were made. One of the nailholes at the short end already has been drilled (a black "dot"). 
 
You can see the red leather underneath the hinge. 
 
Now that the metal was attached to the wooden door, the door (or the other part of the hinges) needed to be attached to the frame. Some material from the frame needed to be removed to fit the curved short end of the hinge. Removing was a bit complicated as the tresoor was already assembled. Luckily the crown was not fixed at that time, allowing us a bit more moving space and better lighting possibilities. We had to test the fitting of the hinges several times, removing some extra wood where necessary, in order to have the correct depth of the door inside the frame (i.e. the same depth as the panels in the frame). When this was correct, the hinges were nailed to the frame with 2 flat nails, and a 'normal' one per hinge.
The inside of the tresoor. The short end of the hinge needs to follow the curvature.
 
Bram creating some saw cuts to define the edges for the recess for the hinge. Doing this by chisel is not possible, due to the six-sidedness of the tresoor. There is no support underneath and hammering a chisel would make the tresoor to wobble.
 
From the inside, cutting the recess for the hinge with a chisel.

Checking the depth of the door to the frame.

Using a small Stanley router plane (No. 271), and sliding sharp flat chisels 
to smooth the surface of the recess for the hinge.
 
 
The hinge inside the recess, seen from the front. Ideally, the hingepin would fit perfectly within the wooden rounding of the frame, thereby preventing the removal of the pin for unauthorized opening of the door. It would also be more pleasing to the eye. Most surviving dressoirs however are just like ours, having a non perfect fit.

The final step was to cut out the recess for the metal U in the frame. After that, some holes were predrilled in the frame for the pins at both ends of the U and the U was hammered in place. This proved to be a strong fix, and there was no need to fold the pins inside the tresoor to secure the U. (in fact, the pins were not long enough anyway.) 
 
Hinges and lock fitted, open door.
 
With this last step done, the tresoor was complete and the crown could be fixed on the top as well. The final tresoor looked like .....
 
The tresoor at the castle will be shown in the next blogpost.

Thursday, 16 February 2023

The Tresoor of Castle Hernen (Part 6): The Front Panel Door

The door of the tresoor of chateau Langeais. A similar layout, but with different scenes was used for the front panel of the tresoor of castle Hernen.

The door consists of a 3-D carving, something which I had not done before and therefore was quite a challenge. We planned to make the topic of the door especially suited for Castle Hernen and the intended time period. The owner of the castle, Het Geldersch Landschap en Kastelen, likes to express the early renaissance period when Reyner van Wijhe was the owner (around 1514). This is still a suitable period for us to make late medieval furniture, as the tresoor was still in fashion at that time. 

 
Some carved doors of medieval dressoirs from the collection of the Rijksmuseum, Amsterdam, the Netherlands.

Left: The replica sandstone plate above the entrance of Castle Hernen. Right: The original sandstone plate with the heraldic arms of Reyner van Wijhe and his wife in the hall of Castle Hernen. 

   
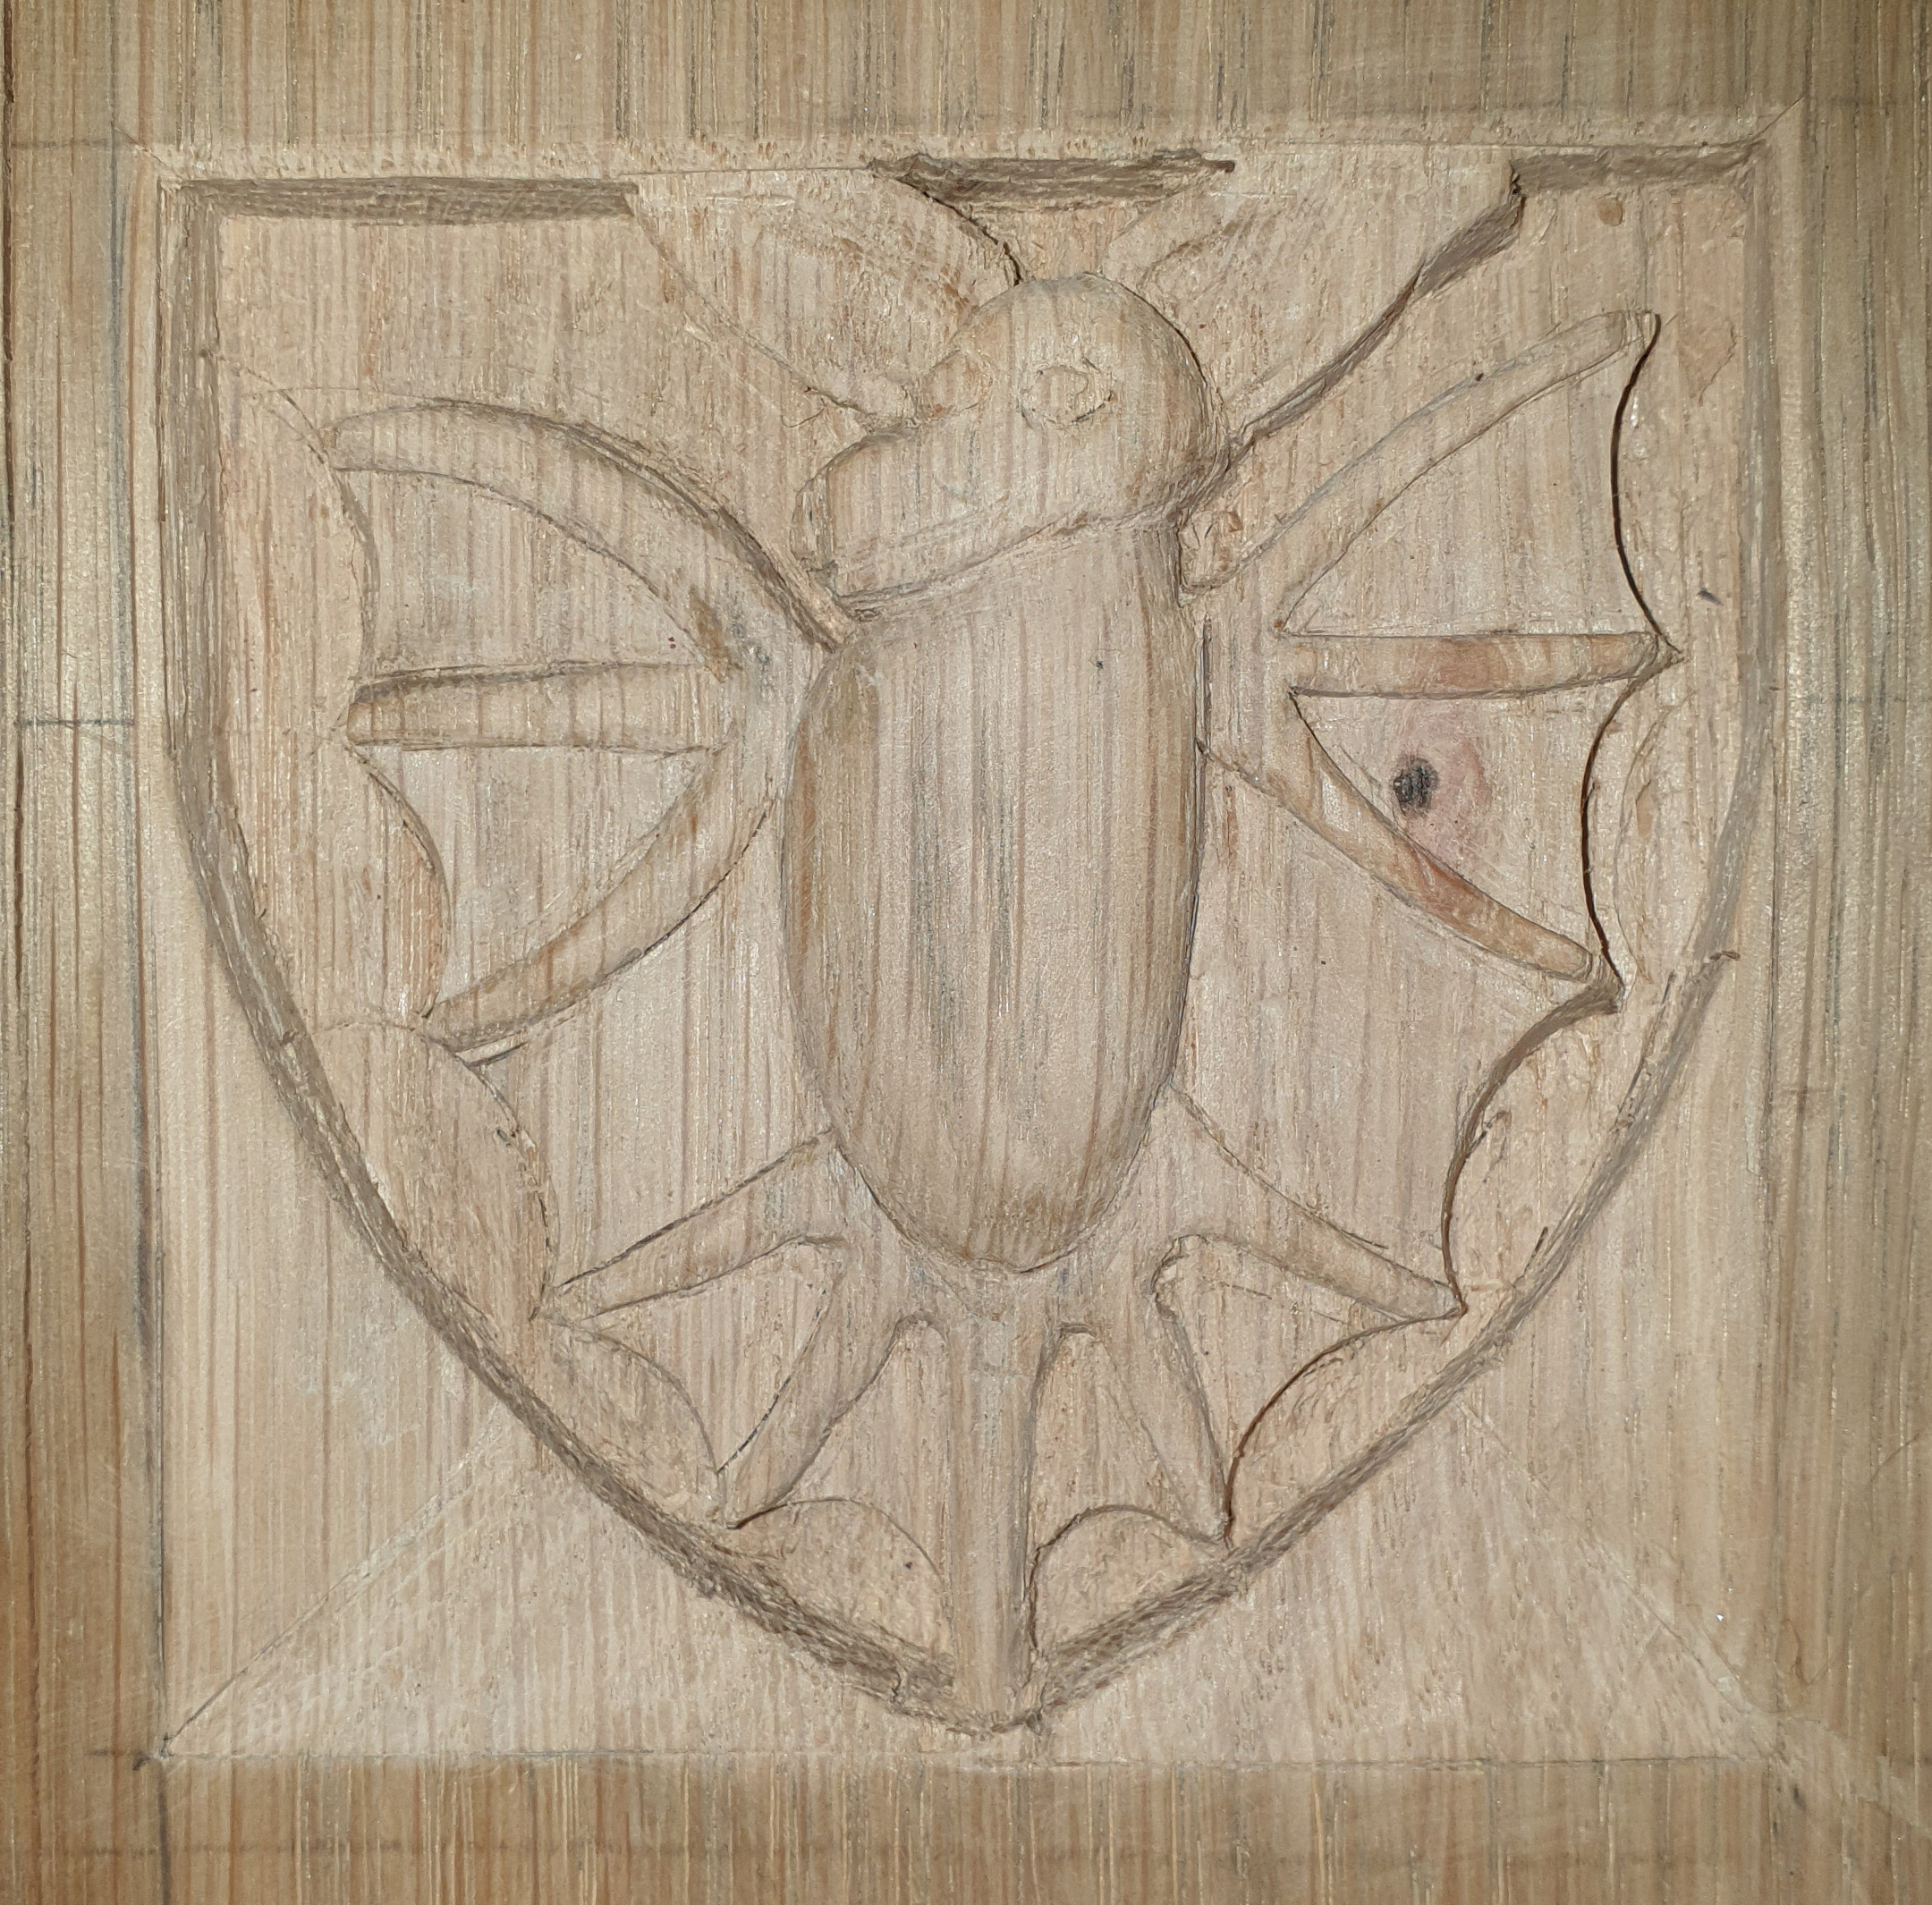
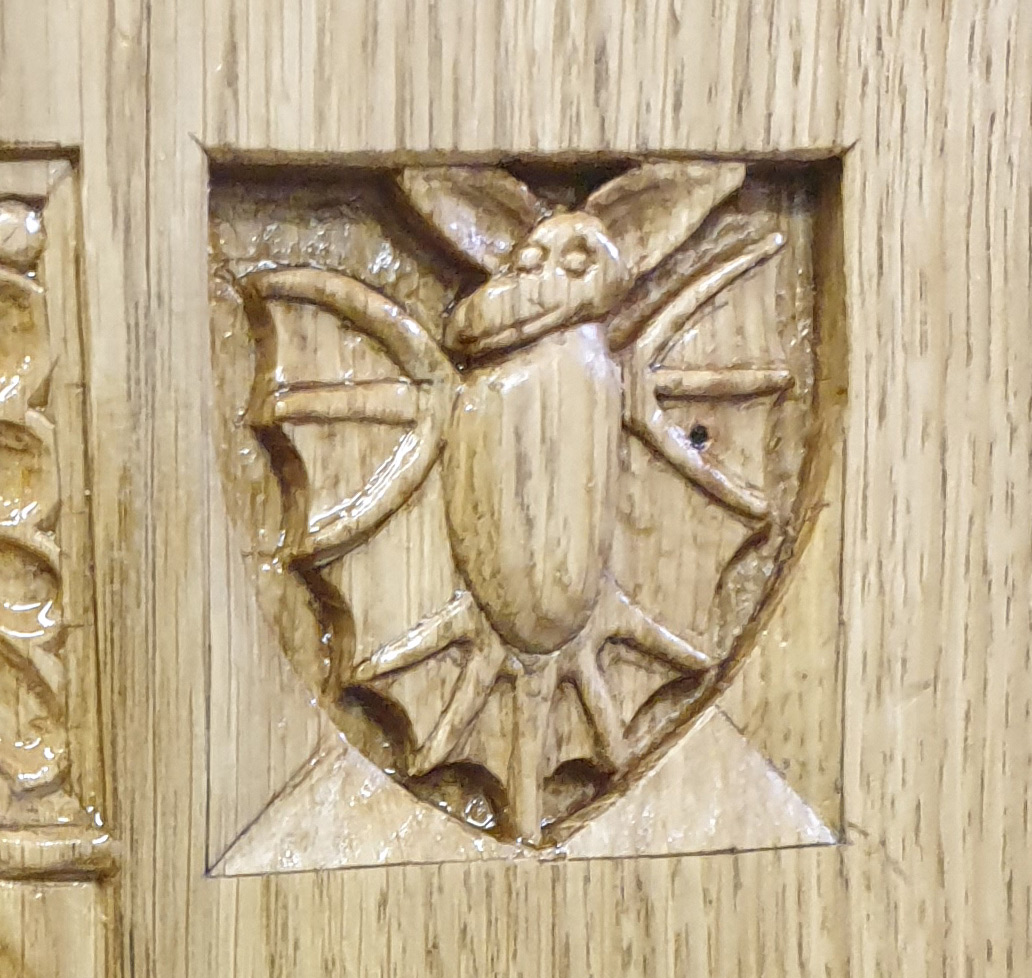
Detail of the heraldic arms: Left - the red half a lion rampant on a silver shield of Reyner van Wijhe, Right -  the black bat on a silver shield of Margreta Van Eegeren.

Reyner van Wijhe and his wife did place a sandstone carving with their heraldic shields  above the entranceway of the castle. Today, the original worn sandstone (coloured) placate can be seen in the old hall of the castle, while a reconstructed one currently presides above the entrance. There was space for both the coat of arms of Reyner (half a lion rampant) and his wife (a bat) above and below the lock plate. We thought it would be more gender friendly if the coat of arms of the wife was place above that of the husband.

Foto
The killing of the dragon of Geldern by Wichard and Lupold. Painting in the townhall of Geldern, Germany.

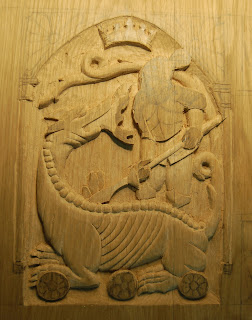
The main part contains a scene from the legend of origin of the duchy of Guelders. This legend tells of a fire-breathing dragon that lived near the German city Geldern. The dragon was found under a medlar tree,  by two local noblemen Wichard and Lupold of Pont (though some sources mention only one) and slain by them around the year 878. With his last breath the dragon cried 'Gelre!!!!' which then became the name of the city and duchy. Later dukes of Gelre - Like Karel van Gelre - added this legend to their lineage to prove their right to rule the duchy.

Left: A fire-breathing dragon on a panel from Château Chambord, France. The F with the crown on the panel stands for King Francois I. Right: a traditional dragon slaying panel with Saint George or Michael putting a lance through the dragons mouth. The dragon is small compared to the armoured saint.
 
 
The battle of Caen (1346) from the Froissart's Chronicle of Louis Gruuthuuse, MS Fr. 2643, Folio 97 verso, Bibliothèque Nationale de France, Paris, France. Dated around 1470.
 
This soldier from the Froissart Chronicles served as example for the dragon killing 'Wichard of Pont'. The poor soldier was transformed, distorted and stretched as well as horizontally rotated using Photoshop.

The scene thereby consist of a fire-breathing dragon, with one of the brothers that is killing it. Below are the three red roses of Guelders. These are also connected to the legend, as they were originally white medlar flowers (of the tree), that were coloured red by the dragon blood. On top of the scene is the crown of the duke, showing he is the ruler of the duchy.

Two ducal crowns of Guelders: one from the armorial of Guelders (1396) by Claes Heinenzoon (left), Heraldic shield of Adolf van Egmont (1438 - 1477), with the chain of the order of the Golden Fleece.

We first thought this was a nice way to connect the castle, the owner Reyner, the GLK and the current province of Guelders together. Then it happened that Reyner was appointed as mayor of Nimweghen and owner of the castle by the rival duchy of Burgundy! A few years later the people of Nimweghen revolted and threw the Burgundians out. Now the scene could also be seen with different eyes. The Thomasguild is, of course, a pro-Guelders guild and insinuated by the scene that the mayor was actually a supporter of the duke of Guelders, instead of the duke of Burgundy.
 
Pre-design of the tresoor door with alternative hinges. 
The main part is intentionally left vague, as we did not have an idea at that time (2019).
 

Making the door of the tresoor

The door of the tresoor measures 40 by 40 cm with a thickness of 3.5 cm, and this was too large to be found as one piece of wood. Hence the front panel was glued together from two oak boards using hide glue. It has two double dovetails inserted at the backside to firmly fix both parts together. The front side is later fixed by the iron hinges.

Left: The two door boards ready for glueing. Right: the backside with the two double-sided dovetails.

The boards of the door glued together and clamped.

Left: The doublesided dovetails were around 8 mm thick and fitted very tightly. Right: the dovetail is glued and pressed into its slot with a clamp.  Afterwards the dovetail was planed flat with the door.

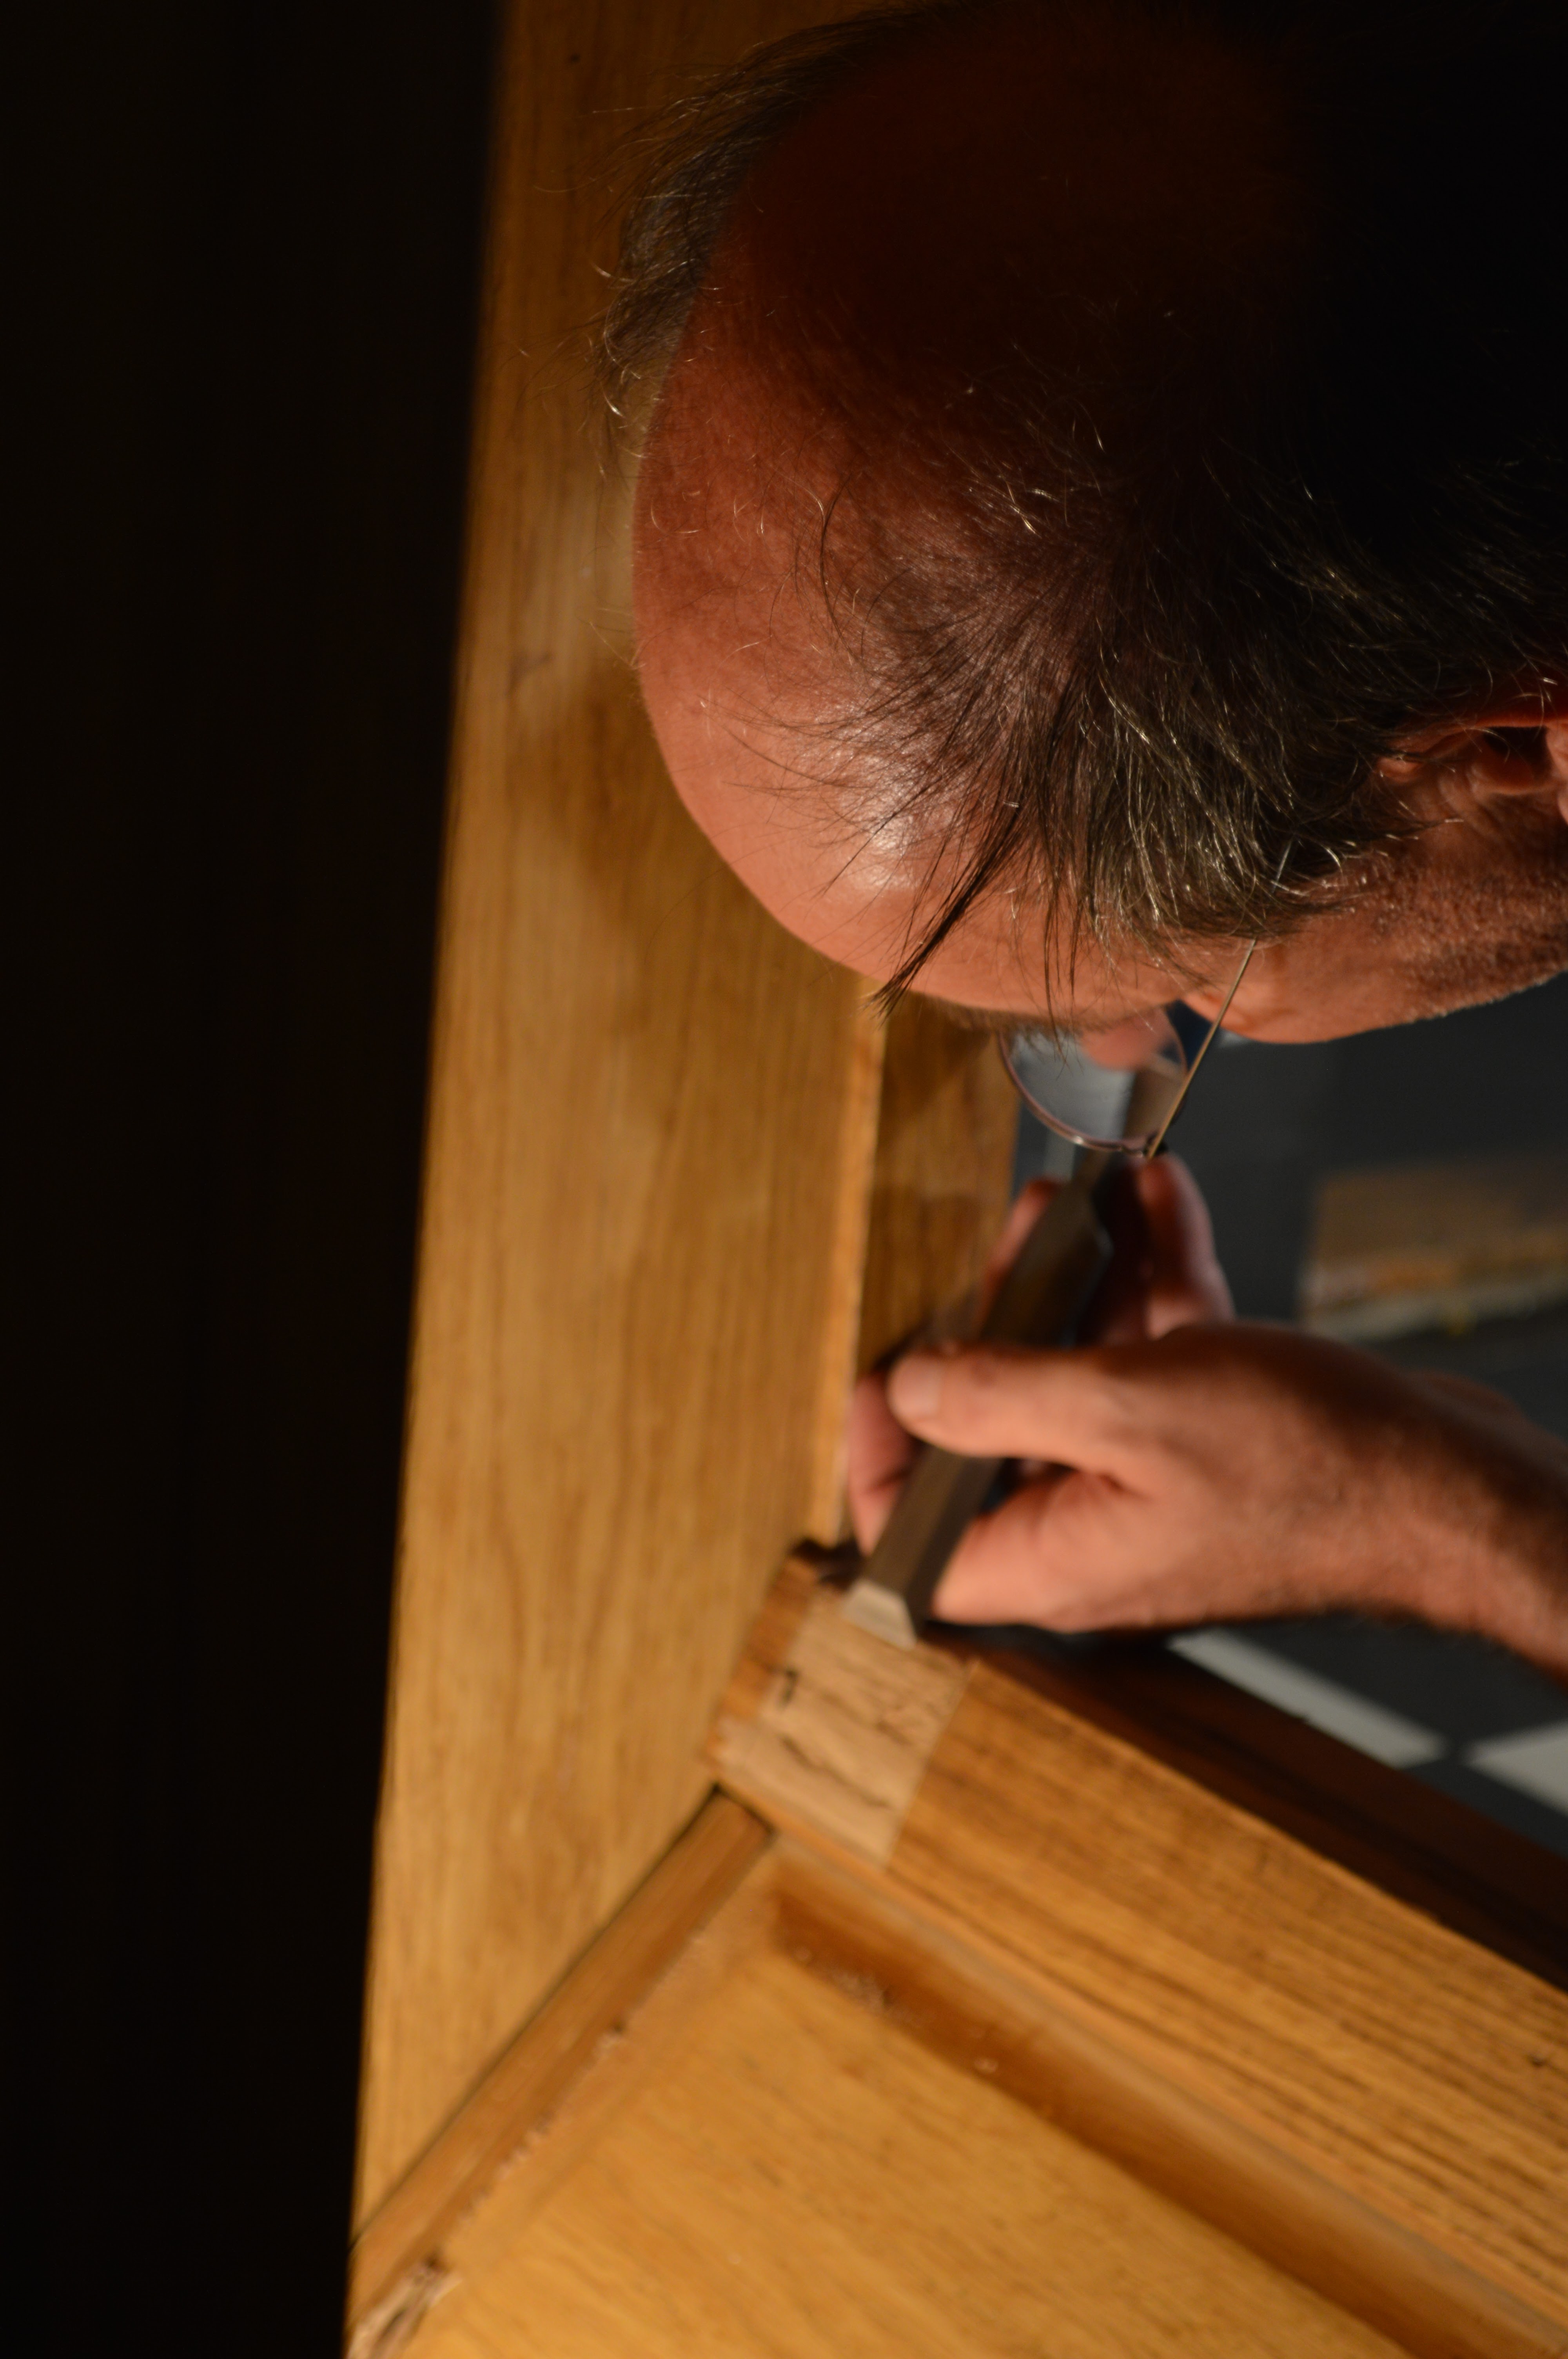
Carving Wichard and the dragon

Left: The first drawing of Wichard and the dragon on the oak door. Middle: the design for Wichard and the dragon. Right: The final drawing on the oak door.

The design was drawn onto the oak. Then, starting from the sides carving was started by hand, slowly deepening the relief and adding more detail. Mostly small sized chisels  (3, 4 and 6 mm), a variety of small fishtail and normal gouges, and carving knives were used. In the photos below the progress of carving is shown.


Some details of the carving. Left: The dragon beak with teeth. Right: The fingers holding the gleve.
 
Carving the border details.
 

Carving the heraldic lion and bat

Also here do the photos below show the carving process of the bat and the lion.

The bat


The lion


Finishing the door

After carving the flat areas of the door were sanded and the door was oiled with linseed oil. The attachment of the hinges and the lock will be dealt with in another blogpost.

The finished carving of the door.


The door within the tresoor, but awaiting the hinges and lock.