Thursday 30 June 2016

Medieval trestles from the Musee des Arts Decoratifs and a painted table top

There are only a few remaining medieval trestles: a set of four trestles can be found in Bruges, Belgium; another set is present in the Musee des Arts Decoratifs in Paris, France. My visit to this museum in April in order to see the trestles there was quite annoying, as the route through the museum was unclear, corridors connecting rooms were locked and the actual entrance happened to be on the third floor. Even more irritating was that most medieval items were displayed in a 'medieval bedroom' setting behind a rope (and stepping over it does sound the alarm). It was impossible to study the furniture from close-by - including the two trestles with their table top. Perhaps the curators did this to hide the fact that the medieval furniture on display looked quite worn and in a bad condition ...

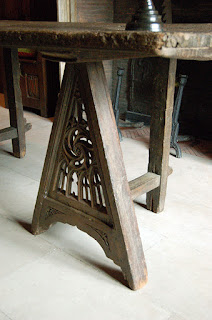
The trestle table as found in the medieval bedroom in the Musee des Arts Decoratifs, Paris. While the two trestles look similar, there is some subtle difference in the rose pattern. Photo: Auction House Aguttes and Musee des Arts Decoratifs.


The trestle table in the bedroom. The worn and much used table top is of a later date and consists of one piece of oak. 
On top are two brass candle-holders and a bronze mortar and pestle.

 The trestle table is only a recent acquisition of the museum. It was bought at an auction in December 2010 for 29,040 Euro. The trestles are made from oak, however the carved panels are made from chestnut. The trestles were dated dendrologically to the late 15th century (1473-1478). Both trestles look quite similar, but there is a slight difference in the roses in the middle. A curious thing of these trestles is that one mortise and tenon is secured by a wedge. The only reason to do this would be that the trestle is collapsable, but this would mean that the other joints are loose too.

 The left trestle and the right trestle. You can see a wedge securing the tenon of the lower horizontal stretcher in the mortise of the vertical beam.

 Detail from the underside of the left trestle. The parts of the A are fixed by two wooden pins at each side.


 The table top has a decorative plank added to the short sides.

 
Some more photos of the trestles.

According to the auction information, the trestle has a height of 86 cm, a width of 60 cm and a depth of 80 cm.  I did some rough measurement at the Musee des Art Decoratifs, using the floor tiles and my hands as a guide, resulting in a slightly smaller size. Two photos were used to calculate the sizes of the different parts with the auction measurements as the basic measurement. The photos allow to measure the angle of the 'A', which was found to be 72 degrees.

Measurements of the medieval trestle of the Musee des Arts Decoratifs.


A low quality image of the backside of one of the trestles. This shows that the lower horizontal stretcher can only be connected to the 'A' with a hidden mortise and tenon fixed with a dowel. Though it is hard to see, the backside of the carved panel is flat.


Despite not being able to see the backside of the trestles myself, there was something else missing. One of my French furniture books also shows a photo of a medieval trestle from the Musee des Arts Decoratifs that has a quite different decoration. So there must be another medieval trestle, either in the depot or on loan to a castle (like Chateaudun) or another museum. One common thing is that they all look quite heavy and sturdy.

Another 15th century trestle from the Musee des Arts Decoratifs. Image scanned from 'Mobilier domestique volume 1. Vocabulaire - Typologie. Nicole de Reyniès. ISBN 9782858224616'. The decorated panel is held in a triangular frame, like the two trestles shown above.

To be functional, trestles have to have a table top. In the Musee the Cluny, also in Paris, is a folding trestle table top which is richly decorated. The table top originates from northern Germany and dates from around 1420.  The table is 4.55 metres long and 76 cm wide. The painted motifs depict allegorical scenes of the 'virtues of princes'. Surrounding the scenes on the table are heraldic arms from Germany, Scotland and of Saladin shown as a representation of the known world. On the edge of the table is a frieze with foliar decoration and heraldic shields. A related folding table is found in Lüneburg, Germany.
 
 The 4.55 metre long table needs six steel trestles to support it.

 
 One of the hinges of the foldable trestle table top.

 The stupidity of crowning an ass.


 The judgement of Solomon.

9 photos covering the complete painted table top. Each scene is surrounded by heraldic shields and helmets.
 
This could be a dovetail where originally a trestle was inserted, fixing it to the table top. 
There are more of these under the tabletop.
 
 Two of the scenes inside a quatrefoil with the 'virtues of princes'. One depicts a king wondering about the four things that he does not know: the way of an eagle in the air, the way of a serpent upon a rock, the way of a ship in the midst of the sea, and the way of a man with a maid. The other one shows the fable of the lion and the rat.

Monday 27 June 2016

Thomasteppich embroidery: the second and a halfpanel.


Anne has nearly finished the second panel of the Thomasteppich; only a tree needed to be 'greened'. As the next scene consists of only half a panel, she decided to move the panel now. When the tapestry was loose from the frame, I took the opportunity to make a one minute video of the embroidered story of Saint Thomas so far. Below two photo's of the 'old' and the 'new' panel in the frame.

Left: the 'old'panel with the unfinished tree. Right: the new panel, with the last scene of this row of the tapestry.
 
 
The unrolled second row of the st. Thomas tapestry. On the left there is also 1.5 panel to do.

Monday 13 June 2016

Upgrading an X-trestle table, part 2

This post continues the story of enlarging/upgrading an X-trestle table of the previous post. I wanted to add a rim to our X-trestle table in the style of the medieval trestle table top in the 'Onze Lieve Vrouwe ter Potterie' museum in Bruges, Belgium. There, the parts of the rim are connected with a mitre joint. The actual joint is hidden, but the wooden nails used to fasten the joint can be seen at the underside of the table.

 
 Left: the underside of the Bruges table, where you can see the dowel pins to fasten the mitre joint. Right: the top of the Bruges table, between the rim and the middle of the table is some space to allow for wood movement.

Adding a rim means that the sides of the original table had to be squared. As this proved to be difficult to do with the table saw, the table top was sawn into four planks that could be easier handled. These were then glued again to each other. The thickness of the table was reduced from 5 to 3.4 cm, the thickness of the planks bought for the rim. The width of the rim was 11 cm.

 The re-glued and squared tabletop with the planks for the rim.

The rim and the original table top were to be connected with a tongue and groove, so a groove had to be cut. This was done using a router. Some extra space (3 mm) was given for the movement of the wood.

A 12 mm groove was cut at the edge of the tabletop with a router.

Left: Cleaning the groove with a hand router plane. Right: The table top with one added rim. A loose feather connects both. The feather was later glued into one groove.

The 45 degree mitres of the rim were cut with a drop-saw. A flat, loose tenon was used to connect both sides of the mitre. For this, in each 45 degree mitre a mortise had to be cut. Also here a router was used. A double screw vise (a modern version of the medieval double screw vise) clamped to the rim was used as a stable platform for the router. The router used to side supports, gliding over the screw vise, allowing only side movement. Then, side movement was blocked by two stops, thereby ensuring an exact measurement of the mortise.

Left: The double screw vise is clamped to the 45 degree angle of the rim and rests on a portable workbench. 
Right: The router has two side supports sliding along the double screw vise.

 
Left: Two stops ensure the maximum length of the mortise. The width of  the mortise is set by the width of the cutter. 
Right: Cutting with the router in process.


Cutting the mortise on the long rim was more problematic, as it did not stably fit in the portable workbench. This time the rim was clamped against a wall table. The portable workbench was now needed as a platform to stand on while operating the router.

The stretcher connecting the X-trestles with the tabletop were originally secured with brass screws to the table top. There is, however, a much better and more medieval way to secure this stretcher to the tabletop. This is a sliding dovetail, which also allows for movement of the wood. A sliding dovetail can for instance be found on the X-trestle table shown in the previous post and on a kitchen table in Chateau Martainville (France). The sliding dovetail used for my X-trestle table is in turn fixed by the rim of the table.

 
Left: The medieval kitchen table of Chateau Martainville, Martainville, France, with a sliding dovetail for the legs. 
Right: Detail of the 16th century X-trestle table showing the sliding dovetail.

The stretchers with the dovetails made on a router table.

Using the router to make the corresponding dovetail groove in the tabletop. Eventually a little wax was needed to be able to shove the dovetail stretcher in.

The stretchers were cut to the size of the tabletop with a 60 degree angle. Here you can see the difference between the blank oak of the tabletop and the 'aged' oak of the X-trestle.

Try-out of the dovetail stretchers with the X-trestles.

Now the tabletop was ready to be assembled. The loose tenon for the mitre joint was glued (which is essentially unnecessary). A jig was used to drill the four holes for the wooden pins of each mitre joint. This ensured that the holes were at exact the dame places at the four corners of the table. 

The table assembled, just before the wooden pins are added. 
The new stretcher to connect the two X-trestles can be seen on the left side of the table top.
 
Left: A set triangle is used to define the place of the drill jig. Right: The mitre with the four pins.

The next step was to adjust the X-trestles, the wedges and large pins to the same style as the rest of the table, e.g. making them blank oak again. For this scraper (for the large flat surfaces) and sanding machine (for the smaller and curved surfaces) were used.

Scraping and sanding the X-stretchers clean.

Also, a new larger stretcher connecting the two X-trestles was needed, as the two sliding dovetail stretchers were set further apart (necessary due to the enlargement of the tabletop). This stretcher is secured by wedges to the central point of the X-trestle. Finally, the table received three coats of linseed oil as protection against regular use as dining table. The finished table now measures 196 by 97 cm.

The underside of the table gleaming with linseed oil. The new stretcher (also oiled) is on top of two blocks to prevent it sticking to the table top.

The X-trestle is secured by two large pins to the table top, while the X-trestles are fixed with a wedge to the horizontal stretcher.

The final upgraded X-trestle table together with different X-type chairs and a strycsitten, ready for a medieval dinner.