At the moment much of the front and back panels are carved. This post will consider the construction of the backside of the tresoor and its panels.
The visible parts: linenfold patterns
For the visible, lower panels on the backside of the tresoor we wanted to have a linenfold pattern. First we considered several pattern options (see below), before finally settling with the pattern found on a 15th century armoire in the Gruuthuuse Museum in Bruges, Belgium.
(Left) Linenfold panel made around 1500-1600 in England. Oak panel carved with linenfold pattern; with a central deep fold, and
two lateral folds reversed, and the ends carved without additional
ornament. Height: 38.7 cm; Width: 16.2 cm; Depth: 1.3 cm; Weight: 0.34 kg. V&A South Kensington, London, UK, museum number 156-1928. They were presumably items from stock, and no further information about them is recorded in the item correspondence.
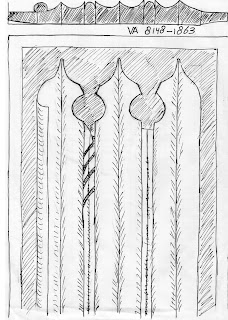
(Middle) Flemish linenfold panel dated late 15th century. One of 96 pieces of Gothic architectural decoration, chiefly of oak, consisting of panels, friezes, pilasters, etc., museum number 8148-1863, average dimensions 20" x 12". The piece was collected by Pugin and used as model by the Thames Bank Workshops for the construction of the new Palace of Westminster. Height 22 5/8 inch; width 7 3/8 inch.
(Right) Linenfold panel from a four-door armoire from the Gruuthuuse museum in Bruges, Belgium. ca 1500, oak.
The complete four-door armoire from the Gruuthuuse museum. oak 167,5 width x 161 height x 55,5 cm depth. Inv. 0.8.VII.
Drawings of front and cross-section of the three panels: VA CIRC 156-1928, VA 8148-1863 and Gruuthuuse armoire
0.8.VII.
First the panels were cut to the the correct size and the side rabbets were planed with a rabbet plane (Stanley 78 or a wooden one) / shoulder plane (for the finishing tough). The end rabbets were cut and planed later, after the linenfolds were made. The linenfolds themselves were first planed with a round moulding plane (1/8'' or 1/4'' depending of the width of the fold) set against a wooden fence. If the initial depth of the fold was reached, carving gouges and custom made scrapers were used to create and smoothe the final form. Custom scrapers were either used by hand or in a scratch stock, where the exact position could be set.
Roughly cutting the small strip of the custom scraper with a Dremel grinding wheel.
In short, the custom scrapers were made as follows: first a small strip was cut from a standard scraping blade. The the rough form was cut with a wheel grinder (Dremel tool), which was in turn roughly smoothed with a round or flat file. Then, a belt sander with a 180 grit belt was used for further smoothing. This was followed by diamond whetting stones (250 to 1200) where a square wooden block was used to stabilise the custom scraper in order to get a square edge on the scraper. Also the flat sides of the scraper were whetted to remove any burrs on the metal.

The three custom scrapers with six funtions:a half-round ('knife-shape') with a small hollow scraper, a round scraper with a bit larger hollow scraper, and a bit larger round with a double hollow scraper (for the middle of the panel).
Left: Bram working on a linenfold panel with the scraping stock. (Right) A custom scraper in the scraping stock.
Smoothing the rounds with a hollow custom scraper set in the scratch stock.
After the long parts of the linenfold were ready, the end rabbets were made. First a groove was cut with a circular saw (marking the boundary), and the end rabbet cleared with a chisel and smoothed with a shoulder plane. Then the outline of the end of the linenfolds was marked with a pencil on the panel with help of a carton. The end of the folds were then cut out with different sized gouges. Especially the fish-tailed Pfeil gouges were of great help here.
Carving the ends of the linenfold.
When the front size of the panel was ready, the backside needed to be
chamfered in order to fit in the (12 mm) groove of the frame. Chamfering was done with a fore plane and a wide round plane (1 1/2'').
(Left) Four panels with the carton of the linenfold end in front. (Right) The 12 mm test groove for the chamfering of the backside of the panels.
(Left) Fitting the panels in the frame. (Right) Linenfold in various stages of finishing at the frame. The unfinished panels are just duct-taped behind the frame, as they did not have their chamfered back.
The hidden parts: plain panels
Some leftover pieces of oak were used for the panels that were hidden from sight. One panel was from a broken oak table top which turned out to be beautifully patterned with flecks and rays. Actually, it was too nice for a part that is seldom visible, but alas these things happen. Another board was sawn lengthwise in half to form two panel pieces. The panels were thinned to 1 cm with a planer-thicknesser and chamfered on the ends with a fore plane. Where the panels connected to each other a V-groove was made on a router table, and the corresponding V-point with a small handplane, a construction similar to that of the scapradekijn for Muiderslot castle. Also the middle part contained one large horizontal panel.
With all back panels finished, the complete backside of the tresoor was constructed.
Left: Construction started with the middle linenfold panels, and continued with the outer linefold panels, the middle panel and the top back panels. (Right) Help with some clamps was needed to fit the vertical stile.


No comments:
Post a Comment